OBEETECH PC Timer Installation Tutorial
Published August 13, 2026
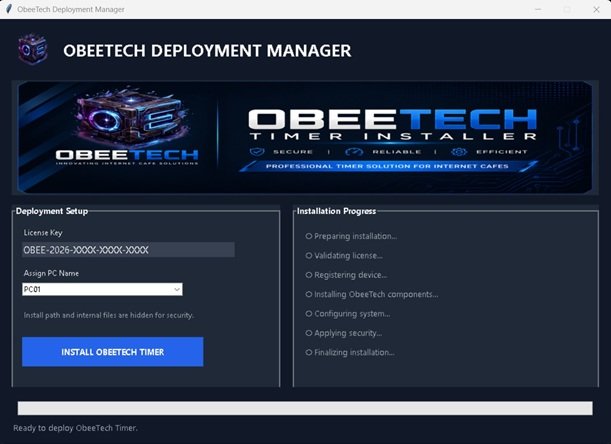
Step 1 — Open the OBEETECH Installer
After downloading the OBEETECH PC Timer installer:
- Locate the OBEETECH installer file.
- Double-click the installer to open it.
- Wait for the installation window to appear.
The installer will automatically proceed to the License Activation screen.
Step 2 — Enter Your License Key
Once the installer opens, you will see a field asking for your License Key.
- Enter your valid OBEETECH License Key.
- Make sure the license key is entered correctly.
- Do not include unnecessary spaces.
Your license key determines which OBEETECH PCs can be activated under your business license.
Step 3 — Select the PC Number
Below the License Key field, you will see a PC selection dropdown.
This allows you to assign the computer to a specific PC number.
For example:
- PC 1
- PC 2
- PC 3
- PC 4
- ...
- PC 50
Example
If you are installing OBEETECH on your tenth computer, select:
PC 10
Make sure you select the correct PC number before continuing.
Important: The selected PC number will be used to identify this computer in your OBEETECH system. Choose the correct number assigned to the physical computer.
Step 4 — Install OBEETECH Timer
After entering your License Key and selecting the correct PC number:
- Double-check your License Key.
- Confirm that the correct PC number is selected.
- Click Install OBEETECH Timer.
The installer will now begin the installation and activation process.
Please Wait
Do not close the installer or shut down the computer while the installation is running.
The installer will automatically install the required OBEETECH components and register the selected PC.
Simply wait until the process is completed.
Step 5 — Installation and Activation Confirmation
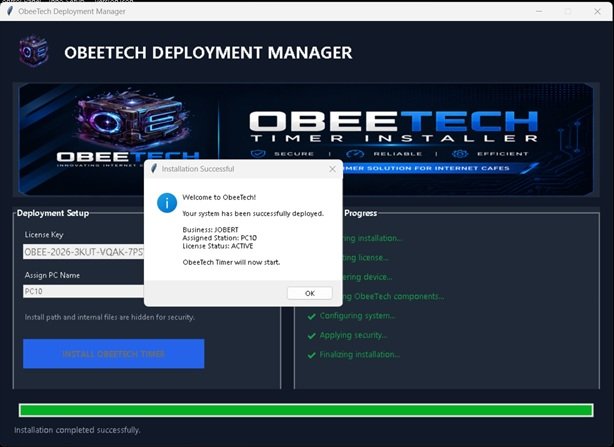
After the installation and activation process is successful, a confirmation window will appear.
You should see information similar to:
Business: OBEETECH
PC: PC10
Status: Active
This means that the selected PC has been successfully registered and activated.
Step 6 — Start OBEETECH Timer
After the activation is confirmed, the installer will display a message indicating that:
OBEETECH Timer will now start.
Click OK.
The OBEETECH PC Timer will now launch automatically.
Installation Complete! 🎉
Your PC is now successfully installed and activated as an OBEETECH PC.
You can now proceed to the next OBEETECH Academy tutorial to learn how to configure the coin slot, timer settings, vouchers, and other PC Timer features.
Quick Installation Summary
1. Open Installer
↓
2. Enter License Key
↓
3. Select PC Number (PC 1–50)
↓
4. Click Install OBEETECH Timer
↓
5. Wait for Installation
↓
6. Confirm Business / PC / Active Status
↓
7. Click OK
↓
8. OBEETECH Timer Starts
Important: Always select the correct PC number assigned to the computer you are currently installing. This ensures that your OBEETECH PC management system correctly identifies each computer.